fashion
beauty
lifestyle
home
travel
CATEGORIES
SHOP
videos
newsletter
links
Lorem ipsum dolor sit amet, consectetur adipiscing elit. Morbi eu.
Lorem ipsum dolor sit amet, consectetur adipiscing elit. Morbi eu.
Lorem ipsum dolor sit amet, consectetur adipiscing elit. Morbi eu.
Lorem ipsum dolor sit amet, consectetur adipiscing elit. Morbi eu.
Compost is, simply put, decayed organic material. The act of composting is adding a golden ratio of this material into a pile, then spreading it in a yard or garden to improve the soil’s aeration, water retention, and overall health.
Organic material needed for composting usually comes from food scraps like vegetable peelings, tea bags, egg shells, and coffee grounds. And because composting involves diverting food waste from landfills, it’s great news for the soil and the climate. According to the U.N. Food and Agriculture Organization, food waste contributes to 8 percent of the world’s total global greenhouse gas emissions. Put in grander terms, if food waste were a country, it would rank third behind the U.S. and China in terms of impact on global warming.
Composting is a fantastic option for people who are looking to reduce the amount of food they contribute to landfill, spruce up their garden, or both. Whether you live in a small apartment, a house with a yard, or on a large homestead, composting is possible — no green thumb required.
The Basics of Composting
A healthy compost pile requires three basic ingredient categories: browns, greens, and water.
Browns are things like dead leaves, branches, and twigs. Greens are materials like grass clippings, vegetables, and coffee grounds. Generally, your compost pile should contain equal parts of greens and browns, and you should alternate layers as you continue the pile. Greens and browns both contribute nitrogen and carbon, respectively, which are two vital elements necessary to the breakdown of organic matter to create compost. The water is added to further break down the organic matter in the pile.
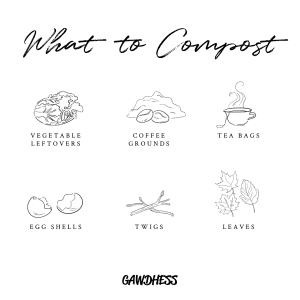
Certain materials play nice in compost, and others should be avoided completely. Here is the EPA’s list of recommended items:

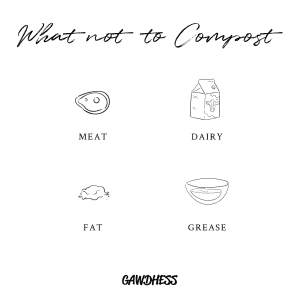
These materials are best excluded from your compost, as they’re either harmful to the soil and plants or create unpleasant odors:

So, you’re sold on composting. How do you get started?
To begin your composting journey, you’ll need to assess how much space you have.
Composting In An Apartment
Even if you’re tight on square footage, composting is still feasible. Here are a few common ways to compost in apartments or in places with little to no outdoor space.
Countertop Composting
Countertop composting is common among apartment-dwelling urbanites, given that it’s compact, easy, and effective. All that’s required is a small bin, like this one from Utopia Kitchen or Bamboozle. Both are made out of high quality materials to last a lifetime and come with charcoal filters, which eliminates unpleasant odors.
Once your container is full, you’ll want to add it to a compost pile in your garden, balcony, or, if you don’t have outdoor space, someplace that accepts compost. Check in your area if there are any community gardens or local farmers that could use some. You can also use this map to find out where compost is accepted across the country!
Vermicomposting
If you’re okay with sharing your apartment with critters, you can also compost in a worm bin. Worms love turning food scraps into compost, and they’re naturally very good at it. They produce odor-free, natural compost that takes about 30 minutes per week to maintain. Like countertop composting, it doesn’t require much space, and the worms don’t like sunlight, so you can stick them in a closet or under the kitchen sink. A reusable plastic storage container works just fine — you’ll just want to drill holes into the top so the worms can breathe. The container will also need moistened bedding made of newspaper, cardboard, or sawdust.
From there, all that’s left is to order the worms (you’ll want to find red wigglers), and you’re good to go! You can find them at a local worm farm (yes, that’s a thing) or order them online. Add them to a container like this, give the worms a good 3-6 months, and voila, you’ve got fresh compost.
Mechanical Composting
Mechanical composting runs on the more expensive side, but if you want compost ready at the push of a button, splurging is worth it. You can find mechanical composting bins that instantly transform food scraps into ready-to-use compost. All you need is a power outlet and a bit of extra counter space.
Composting Outdoors
If you’re not confined to indoor space, your composting options increase exponentially. There are a variety of composting methods used outdoors, each with their own added perks.
Cold Pile
Cold piles are ideal for small-scale gardeners who don’t want to continuously monitor their compost. Creating one is simple: just begin adding kitchen and garden scraps to a pile outside. It works as you go, meaning you can take the finished compost from the bottom of the pile as you add new material on top. Cold composting is also nice because it doesn’t require you to turn the compost. However, it does take up to a year or more for the raw material to turn into finished compost.
Hot Pile
A hot pile is more labor-intensive than a cold pile, but under ideal conditions, it can produce compost in a little under a month.
To start a hot compost pile, begin by spreading a four to six inch layer of browns over an area at least three feet long and three feet wide. Then, add a two to three inch layer of greens, followed by a few shovels of soil. Wet the pile thoroughly, and continue adding layers like this until the pile is at least three feet high. You’ve got a hot pile!
The trick here is to keep turning the pile every few weeks and adding more moisture if it’s drying out. Hot piles can reach up to 140 degrees Fahrenheit, which is the optimal temperature for microbes in the pile to break down the organic matter. If the pile is uncomfortably hot when you put your hand in it, you’re doing it right.
Tumbler
This method is essentially enclosed hot pile composting. After adding your browns, greens, and a bit of moisture, all you have to do is turn the handle on your tumbler every three to four days. Tumblers are popular because they require less physical output on the user’s end, but they can get quite expensive. Depending on the size you’re looking for, a tumbler can run you anywhere between $45 to hundreds of dollars.
Outdoor Bins
If you want to keep your piles out of sight, you may consider building or buying a compost bin that shields your piles from view. There are various materials to choose from for outdoor bins. Cedar wood is one of them, thanks to its durability and rot-resistant properties. You can buy one pre-made or build it yourself.
You can also easily build a concrete bin (again, it’s durable and won’t rot). If you’re looking for something less clunky, consider wire bins, which are easy to make, inexpensive, and portable. If you don’t want to build one yourself, a store-bought plastic bin will work just as well.
Whether you’re working with a counter space or a big plot of land, there are tons of options for turning food waste into nutritious compost. Your plants — and the planet — will thank you. Happy composting!
Mandy Reene
My goal is to inspire you to curate all aspects of your life, while helping you walk a little more mindful on the planet.